
Background: The JAM (Joy's Art Machine) is a machine that distributes art. This project was fully funded by the Alchemy community. We are on track to collect somewhere between 200-300 pieces of art to distribute, including works by Catlanta and Evereman. We are actively collecting works of art, so if you're interested in contributing, you can email Joy at joyogozelec@gmail.com.
The JAM explores two of the 10 core Burning Man principles: Decommodification and Gifting. We express Gifting by distributing art through the machine. Gifting trees are a familiar sight at Burns, but suffer from accumulating trash or trinkets. By gifting art (a gift in itself) we create a sort of on-demand gifting tree. We express Decommodification by not allowing the JAM to accept money. Instead, art is distributed by the machine on a timer. The machine lights up, and you push a button to receive art.
If you're interested in learning more about the project or want to get involved, check out our Meetup calendar for the next meeting or build, or email me at emptyset@freesideatlanta.org.
 Last Saturday I worked with Brian on the frame of the front and back 4x8-ft sheets. We're using a pressure-treated wood, so the frame is going to hold the structure firm since the sheets have a tendency to warp a little. Pressure-treated wood is also going to require a little more research to figure out what we need for painting.
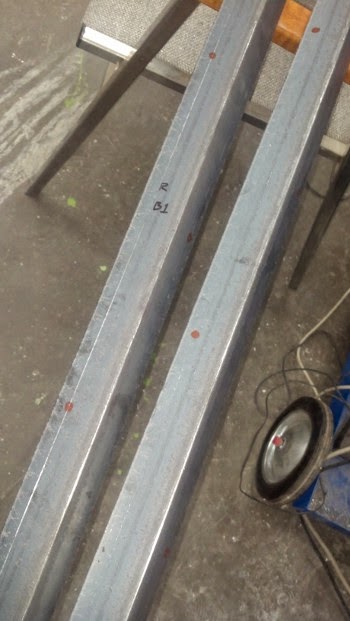
We decided to start by marking exactly where we wanted to drill holes for the nuts and bolts to go. We went with a staggered pattern. We first created a template using a scrap piece of 8-ft long wood, and then scored the angle iron to make our markings. Every hole is marked, so for the next Build one or two volunteers can simply drill out all the holes. Essentially, we're creating a kit to assemble the JAM.
After marking all the steel, we made sure to label each piece with "top", "bottom" and whether it was a left or right part (if you face the "front" or "back" side of the machine). This will help us keep track of where everything needs to go so nothing gets mixed up in assembly.
Then, we put down the left and right frame steel, and put down a 4x8-ft sheet. We held everything together and then marked off some angle iron to cut for the top and bottom parts of the frame. Brian also cut out some tabs so that the pieces would sit flush against the sides.
 After this, Brian was ready to weld. He did a few spot welds with the 4x8-ft sheet in place, and then we remove the sheet and completed the rest of the welding. We know have two frame parts that look like a bed frame! The JAM is going to be huge.
In other updates, we've sent out an order from Adafruit for the button, Arduino, and LED light strips. That should arrive in the next week or so, and then prototyping the controller and timer can begin. At the next build (tonight!), we have holes to drill in the steel frames, prototyping the carousel, shaving an inch off the "side" panels, and research on the paint. For those that are artistically inclined, we need some help with vector graphics and creating stencils that we'll be using to paint the sides. There's a little something for everyone!


The JAM explores two of the 10 core Burning Man principles: Decommodification and Gifting. We express Gifting by distributing art through the machine. Gifting trees are a familiar sight at Burns, but suffer from accumulating trash or trinkets. By gifting art (a gift in itself) we create a sort of on-demand gifting tree. We express Decommodification by not allowing the JAM to accept money. Instead, art is distributed by the machine on a timer. The machine lights up, and you push a button to receive art.
If you're interested in learning more about the project or want to get involved, check out our Meetup calendar for the next meeting or build, or email me at emptyset@freesideatlanta.org.
We decided to start by marking exactly where we wanted to drill holes for the nuts and bolts to go. We went with a staggered pattern. We first created a template using a scrap piece of 8-ft long wood, and then scored the angle iron to make our markings. Every hole is marked, so for the next Build one or two volunteers can simply drill out all the holes. Essentially, we're creating a kit to assemble the JAM.
After marking all the steel, we made sure to label each piece with "top", "bottom" and whether it was a left or right part (if you face the "front" or "back" side of the machine). This will help us keep track of where everything needs to go so nothing gets mixed up in assembly.
Then, we put down the left and right frame steel, and put down a 4x8-ft sheet. We held everything together and then marked off some angle iron to cut for the top and bottom parts of the frame. Brian also cut out some tabs so that the pieces would sit flush against the sides.
In other updates, we've sent out an order from Adafruit for the button, Arduino, and LED light strips. That should arrive in the next week or so, and then prototyping the controller and timer can begin. At the next build (tonight!), we have holes to drill in the steel frames, prototyping the carousel, shaving an inch off the "side" panels, and research on the paint. For those that are artistically inclined, we need some help with vector graphics and creating stencils that we'll be using to paint the sides. There's a little something for everyone!
Comments
Post a Comment