After seeing Joshua Oster-Morris with this little box I asked him to write a post for us on how it came it to being. Worth the read.
Dateline: San Francisco, May 10 2011: Google I/O 2011 opens up with much fanfare and I, a lowly “software guy”, sit down to listen to a couple of sessions on Google Web Toolkit. I have been using it to develop a motorcycle navigation website (http://www.dualsportmaps.com) and its always good to try to pick up a few new tricks of trade. These are mainly esoteric talks about development tools, but there is also one about a new API called RequestFactory that allows state aware communication between client and server characterized by its low bandwidth. They discuss how it might be handy to use as a protocol for communicating with Android devices. To that, my ears perk up and I make my best impersonation (imdogination) of Scooby-Doo. I have been doing a little Android development for personal projects, I have an extensive craft cocktail recipe book that I have compiled through pilgrimages to the best bars around the globe, and I have created an app so I can find them quickly on my phone. I found my options for sending data back and forth a little tedious (I was just creating my own one-off APIs). My interest was diverted from GWT and I segued to sessions on Android for the rest of the day.
The Android sessions were full of energy and free schwag. I have little twinges of jealousy as each session seems to close with a nifty new gizmo going into the hands of each spectator in the hall (I am streaming the sessions from my office in Atlanta so I get nothing). More talks about tool chains and performance mods followed until I see a session on the schedule about Open Android Accessory Development Kit (ADK). What is that pray tell? At this point, my day is shot and nothing else is going to get done anyway so I settle down to watch another session. ADK is an API for starting USB connections between small form factor USB Host microcontrollers and your Android phone or tablet. Phones in particular are unable to host a USB dialog. They are just client devices, meaning they need to plug into a Host device such as a computer which manages the state of the conversation. Google had taken the idea inside the IOIO (yo-yo), a PIC based USB Host controller for Android available at Sparkfun, and extended it to the Arduino platform. Really, the ADK is just an API and it can be implemented on any Host compatible platform, but Google’s official implementation uses the Atmega2560 (with Arduino bootloader) and the MAXIM 3421EE USB Host controller. They begin to show off some pretty cool tricks where they control some giant contrivances with their phones and tablets including a man sized marble labyrinth.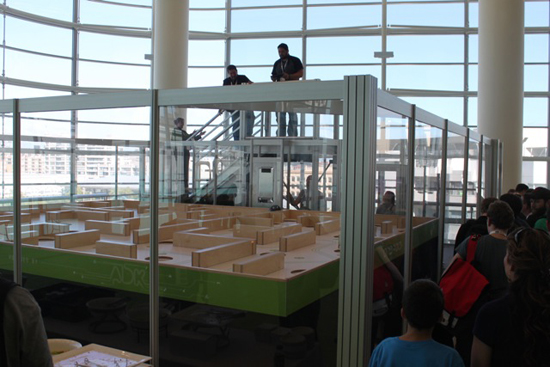
http://www2.pcmag.com/media/images/258238-labyrinth.jpg
At this moment I little bolt of lightning strikes inside my Scooby-Snack addled brain. Why don’t I make a mobile version of my website? I never considered it before because phones don’t work well with gloves and motorcyclists wear gloves. With this, I could make a remote control and put the phone in a waterproof case.
Fast forward 16 days and I’ve got a working version of the Android app (which is a fully functioning GPS device that uses OpenStreetMap vector data to render maps while offline) and I go about sourcing some hardware to create my first version of the remote. The Google board is very expensive ~$300, but in the intervening weeks a few more suppliers have entered the market place and I settle on the Freeduino USB Host board from moderndevice.com ~$70. It arrives a week or two later. About 6 hours after starting up the Arduino IDE for the very first time I’ve got a working prototype of my app remote control. Now, I haven’t used a soldering iron since 1991 when I was a freshman in college so this wasn’t easy for me, but I got it done. In fact, I used a gas powered thing to assemble the joystick shield kit I purchased from Sparkfun. I sent moderndevice.com a video of his new board in action and they posted it on their website. http://www.youtube.com/watch?v=kmnhFc3-oAI
I learned a few things from this. First, working with Arduino hardware is easy, even for a guy who has never done any embedded programming before. Second, Android is pretty much straightforward Java programming so if you can do one, you can do the other. Thirdly, I need to waterproof this remote because it’s fricking cool! How the hell can I do that? The only thing I know how to make, other than software, is cocktails. A little research introduces me to a thing called a 3D printer and that a place called Freeside Atlanta has one. On a Tuesday, with a few roughly drawn 3D files in my pocket I ride down to check the place out. The people there generously let me print out a couple of parts after the meeting (thank you Panda) and I get my first taste of the frustration of building tangible things. Unlike debugging software the iterative process is stultifying and slow. That is another story though...
What I learned from the that first trip to Freeside was the I needed to shrink down my electronics, A LOT. While the Freeduino host board from moderndevice.com works great I can’t really use it for this because it is just too big to shrink into useful sized package.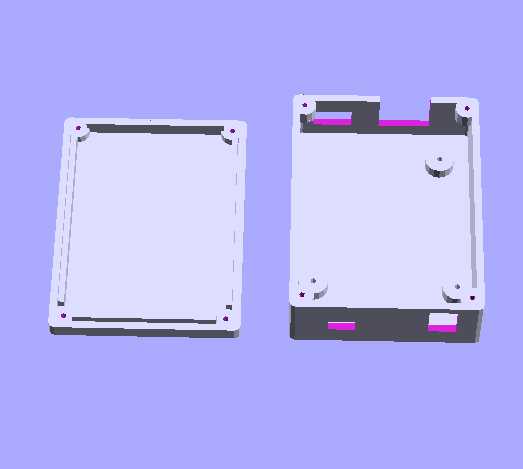
After more research I decide to give the Arduino Pro Mini a try with a circuitsathome.com USB Host shield attached to it. It is much smaller than the first Arduino, about 1/6th the size.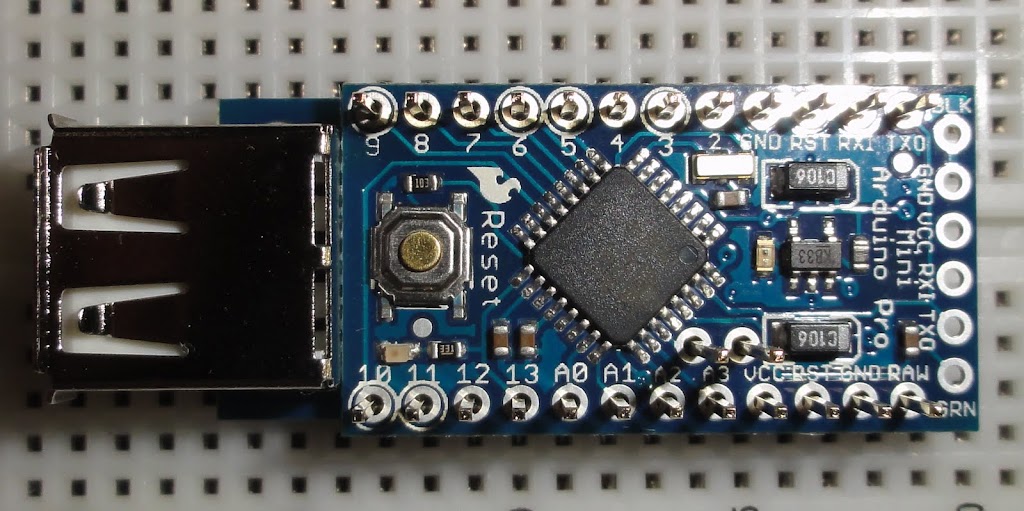
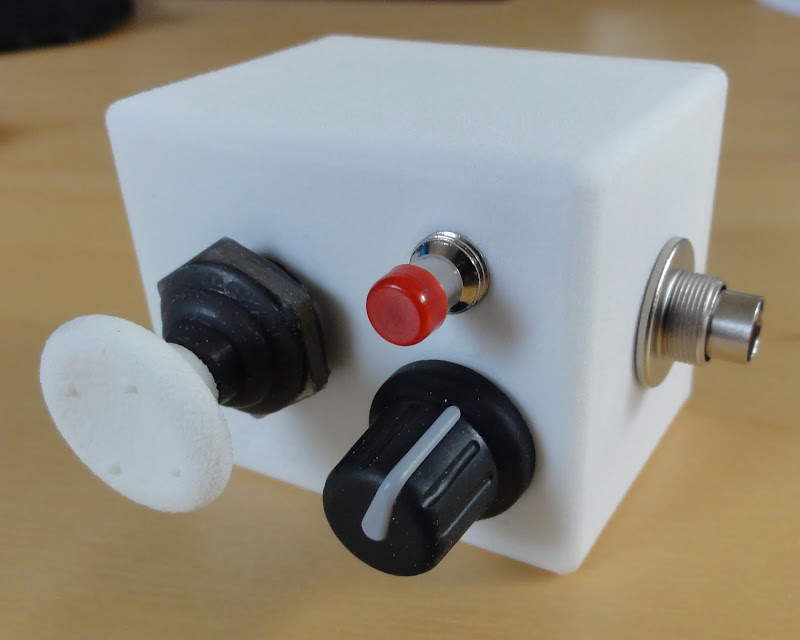
The smaller size allows me much more freedom to box it up and place it conveniently on the motorcycle. I ultimately design the enclosure below using my new toy SolidWorks. It is just awesome! It’s very expensive, but it is also an amazing tool that takes all the guesswork out of part design.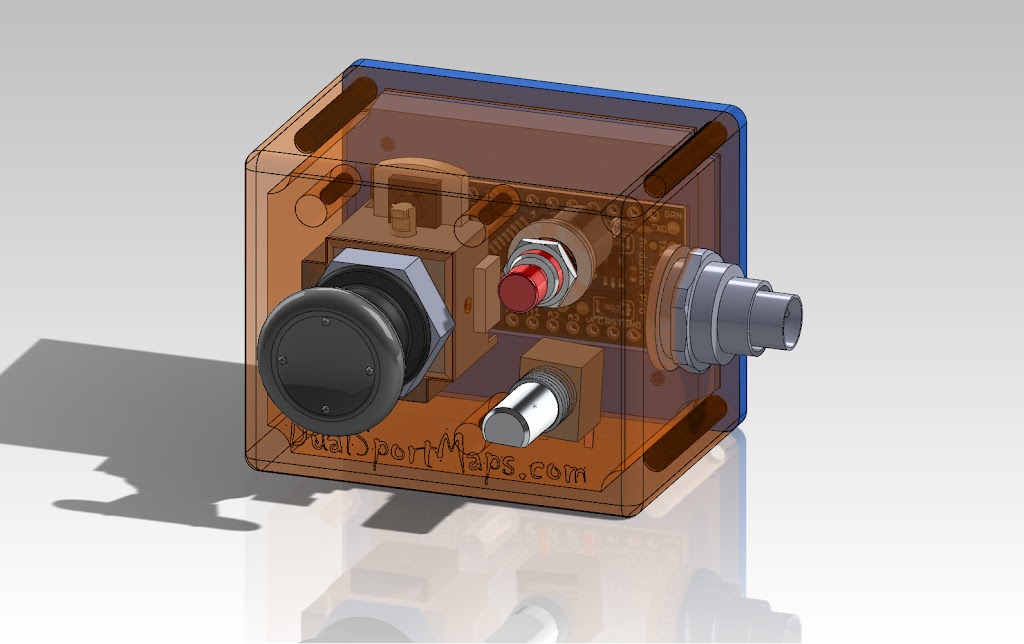
I order the parts for this design and proceed to actually build one.
It looks pretty good but some crash testing tells the plastic I was using was not up to the task.
http://www.youtube.com/watch?v=dHl4iiPZfUU
http://www.youtube.com/watch?v=T_CeNxcn8RU
So I come up with new a design and a new material.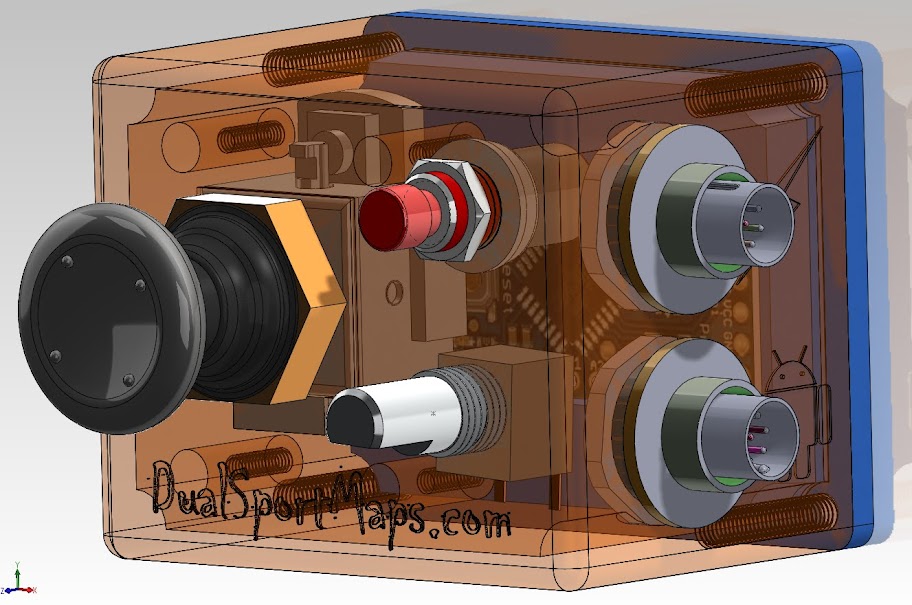

This stuff is tough! Tougher than nails. I devised several tests to challenge it, but pretty much anything I hit it with broke. The assembly is a real bitch though! It’s taking me hours to assemble one of these bastards.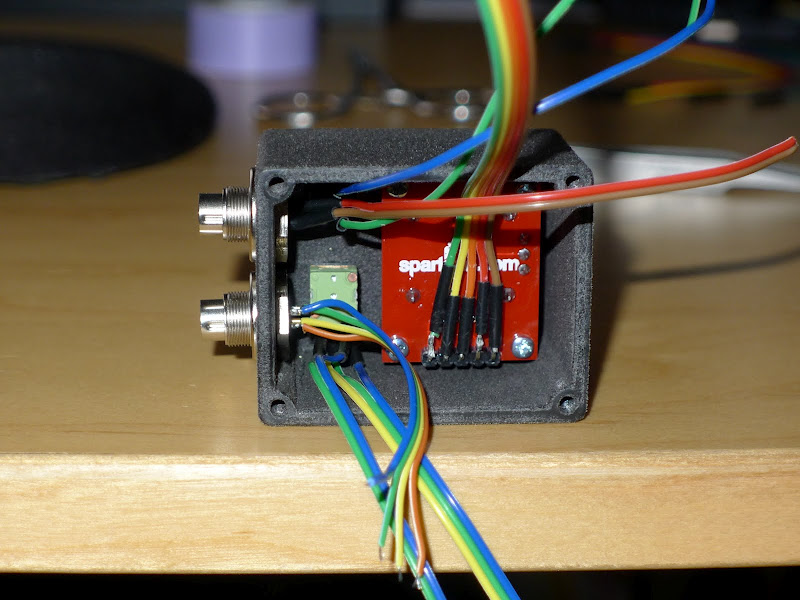
Plan three starts to hatch in my brain. This time with the help of a new friend and app customer I decide to build custom electronics. We agree on a 3 board design. I don’t know diddly about this electronics stuff but he teaches me how to read a schematic and working over the phone we actually succeed in designing and building new custom electronics which helps shrink everything down into a dainty little package. (I’ve since moved on to a milled aluminum enclosure which is boss)
http://www.youtube.com/watch?v=F9fpvCJAIvQ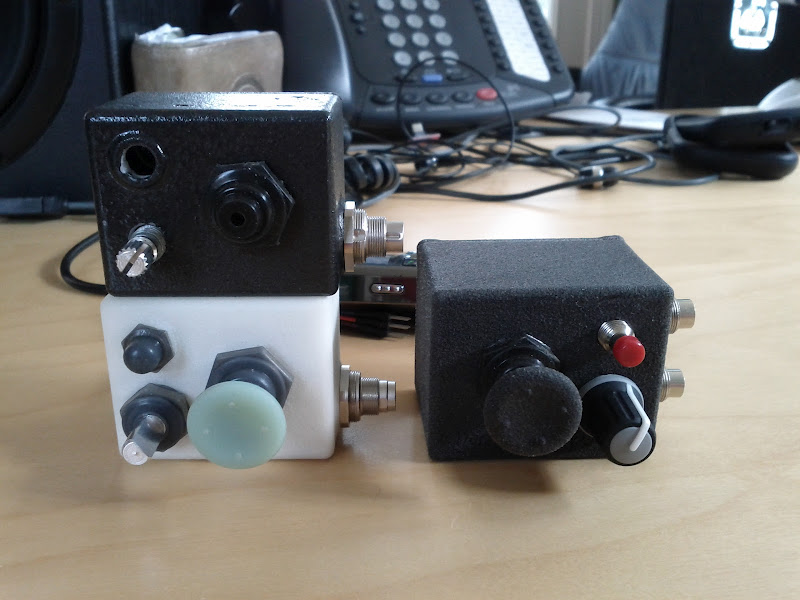
http://www.youtube.com/watch?v=RiWlCVZFWnM
For me, this is another epiphany. I no longer am limited to electronics I can buy at the store. I am only limited to what I can imagine and build. The latter list is WAY larger than the prior one so let me tell you, my world has gotten a lot more interesting since this epiphany.
After taking part in the design process of the new electronics for my remote control I decide to try my own hand at circuit design. I am able to download some very useful and inexpensive PCB design software called Eagle and get started right away. Essentially no barrier to entry (unlike SolidWorks).
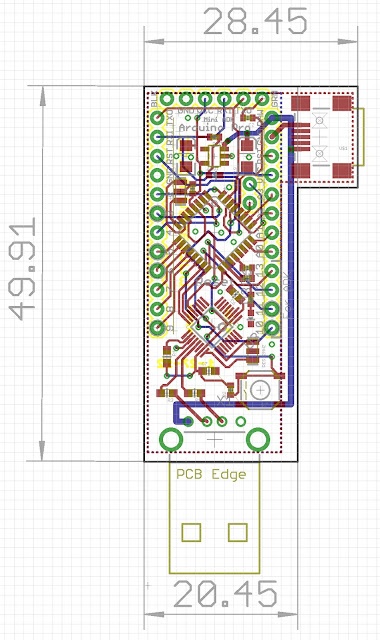
The first board I decide to build is a throwback to the board in the second remote design, it is similar to the Arduino Pro Mini except it has an integrated USB Host in it. It’s a small and incredibly useful tool. In itself, it is not a product, but it is something that creative people could use to build products. I felt the need to redesign it for several reasons. First off, the cost of two products from different vendors each with their own shipping costs is rather high > $40. Second, because the MAX3421ee require 3.3V to operate and USB requires 5V to operate there is an inherent incompatibility that the one small sized option available in the marketplace did not handle. The obvious solution is to build an Arduino with a the MAX3421ee with both a 3.3V, and a 5V linear voltage regulator (LDO). USB has a rather specific requirement of supplying 500mA to a connected client so I needed to make sure I specced the 5V LDO at 500mA and design the board accordingly. It takes a lot of sifting though Digikey.com to find parts that will squeeze into the small board that I want to design. Learn TONS about everything reading the datasheets. Along the way I come up with a few ideas for the board as well.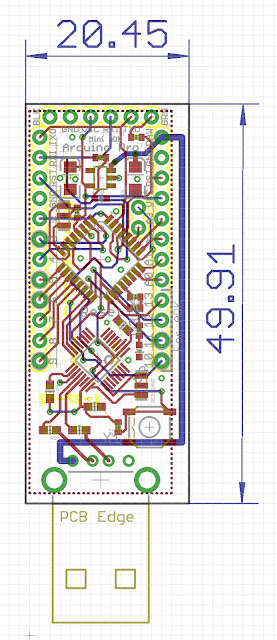
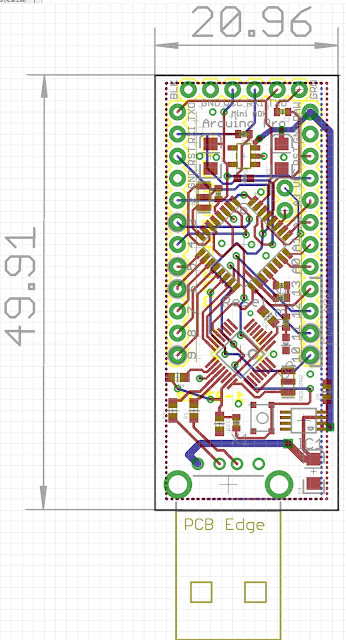
I finally settle on this guy and have it built at seeedstudio.com who will build my boards for <$1.50 each, delivered from China when I order 10 (so it costs $14.90 total).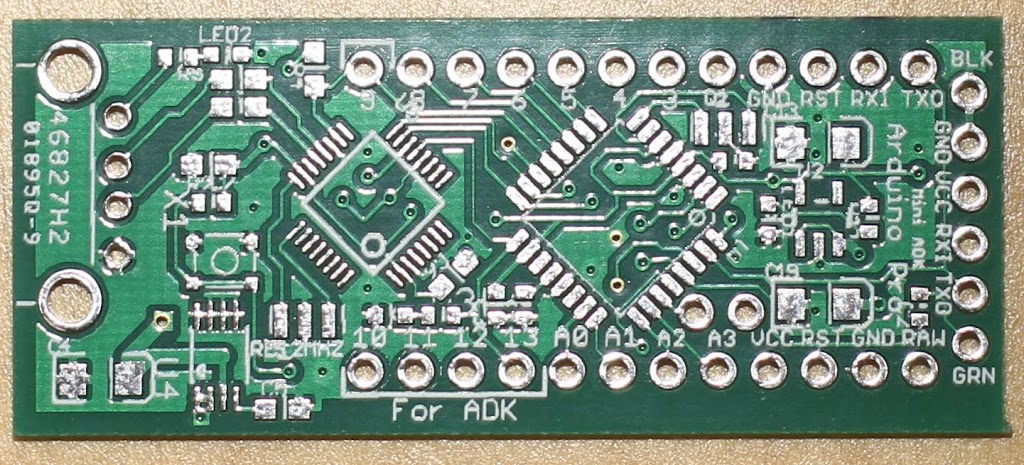
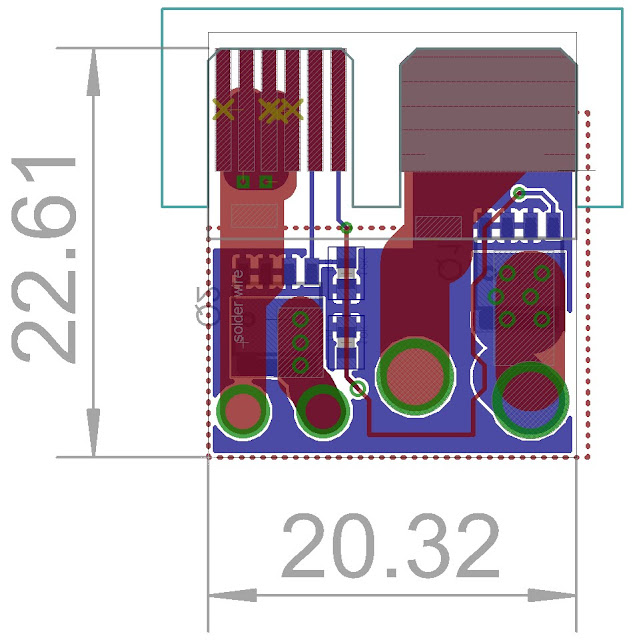
In anticipation of the PCB delivery I order all the parts in the bill of materials (BOM) from Digikey and wait for my new boards to arrive. When they finally do arrive, about 3 weeks from order to delivery for the cheap delivery option, I realize there is a problem The 5V LDO I have and the area on the PCB do not match. What have I done?! The large chip below is what I had and the small chip below is what I needed. It goes in that little spot at the bottom left of the board above.
Always ready to make lemonade from lemons I go about reading the datasheet of the larger LDO I ended up with. It seems strangely perfect from what I want to do with it. This fact is a little strange to me because it is so much larger and yet not over qualified for what I am doing. I begin to wonder how the chip I chose could actually do the same thing in such a smaller package. I read the smaller part’s datasheet again and realize I must have gotten confused along the way. It cannot do what I need (it claims to be able to in bold print but the fine print clarifies that it can only do so when the Sun is conjunct the Moon in the Seventh House). Somewhere during the part drawing process I started looking at the wrong datasheet and then drew the wrong part I guess. At least I ordered the correct one. No worries though, this board is exactly as useful as the 2 board combination I was replacing (without its 5V LDO) so its not a major loss. I am able to salvage these boards with a little glop of solder across all the pads on each side of that chip.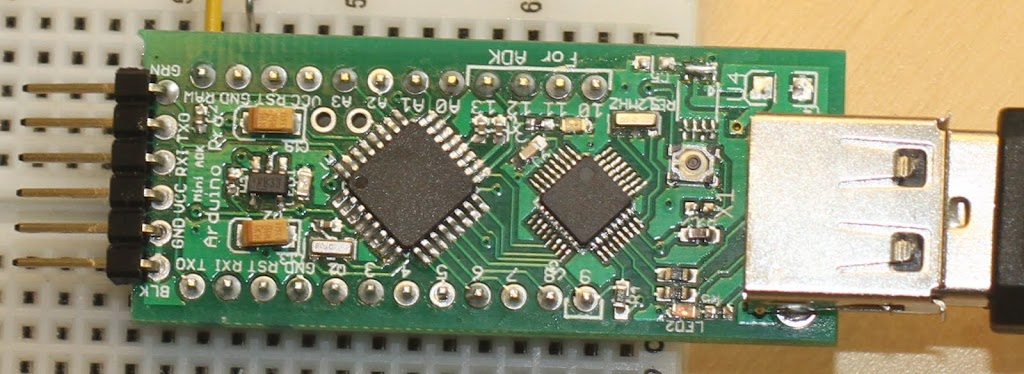
Now I head back to Eagle to fix my mistake and order another pile of boards that actually fit the LDOs I have. Another $15 spent. Another 3 weeks pass. And viola!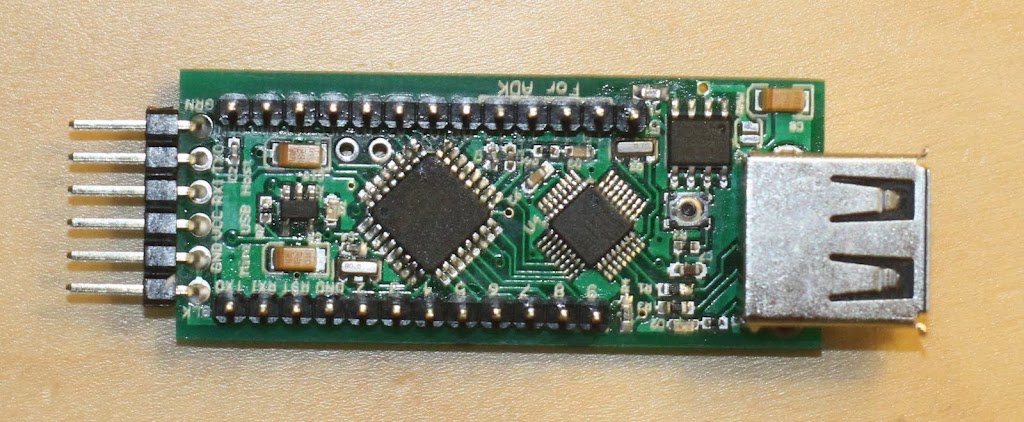
You wouldn’t think that I could squeeze the “giant” chip in the place of that tiny one on that already cramped board, but amazingly I was able to and the overall size did not change at all. This board works exactly as I wanted it to and I am quite pleased with it. I am in the process of putting together a bunch of cool little demos to show off all the things it can do (talking to Android, communicating over bluetooth, HID, GPS, SLR camera control) and then I will start a Kickstarter to see if enough other people are interested in having some of these to get a large batch made. I’ve got a vendor in China willing to build them for about $17 if I build 500. I requested a bid for 100 from an on shore outfit as well but it has not come in yet. If the price is right, I’ll be able to do the Kickstarter with a smaller threshold price.
I am not done of course. No sooner did I get this guy built did I start using it to work on a new design for a new product. I’ll save that story for another time, but I’ll leave you with a teaser of it...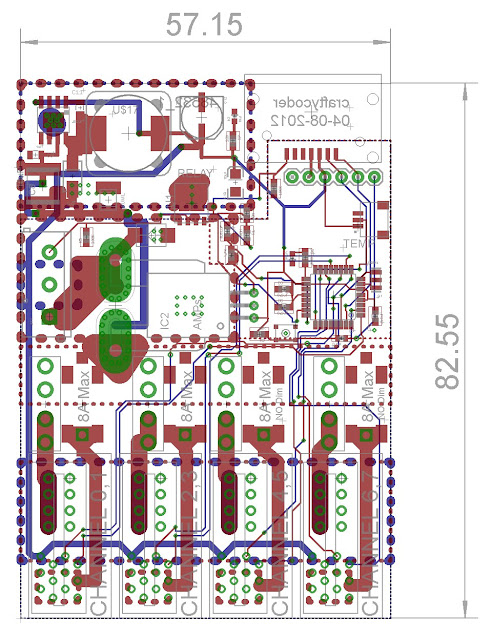
Dateline: San Francisco, May 10 2011: Google I/O 2011 opens up with much fanfare and I, a lowly “software guy”, sit down to listen to a couple of sessions on Google Web Toolkit. I have been using it to develop a motorcycle navigation website (http://www.dualsportmaps.com) and its always good to try to pick up a few new tricks of trade. These are mainly esoteric talks about development tools, but there is also one about a new API called RequestFactory that allows state aware communication between client and server characterized by its low bandwidth. They discuss how it might be handy to use as a protocol for communicating with Android devices. To that, my ears perk up and I make my best impersonation (imdogination) of Scooby-Doo. I have been doing a little Android development for personal projects, I have an extensive craft cocktail recipe book that I have compiled through pilgrimages to the best bars around the globe, and I have created an app so I can find them quickly on my phone. I found my options for sending data back and forth a little tedious (I was just creating my own one-off APIs). My interest was diverted from GWT and I segued to sessions on Android for the rest of the day.
The Android sessions were full of energy and free schwag. I have little twinges of jealousy as each session seems to close with a nifty new gizmo going into the hands of each spectator in the hall (I am streaming the sessions from my office in Atlanta so I get nothing). More talks about tool chains and performance mods followed until I see a session on the schedule about Open Android Accessory Development Kit (ADK). What is that pray tell? At this point, my day is shot and nothing else is going to get done anyway so I settle down to watch another session. ADK is an API for starting USB connections between small form factor USB Host microcontrollers and your Android phone or tablet. Phones in particular are unable to host a USB dialog. They are just client devices, meaning they need to plug into a Host device such as a computer which manages the state of the conversation. Google had taken the idea inside the IOIO (yo-yo), a PIC based USB Host controller for Android available at Sparkfun, and extended it to the Arduino platform. Really, the ADK is just an API and it can be implemented on any Host compatible platform, but Google’s official implementation uses the Atmega2560 (with Arduino bootloader) and the MAXIM 3421EE USB Host controller. They begin to show off some pretty cool tricks where they control some giant contrivances with their phones and tablets including a man sized marble labyrinth.
http://www2.pcmag.com/media/images/258238-labyrinth.jpg
At this moment I little bolt of lightning strikes inside my Scooby-Snack addled brain. Why don’t I make a mobile version of my website? I never considered it before because phones don’t work well with gloves and motorcyclists wear gloves. With this, I could make a remote control and put the phone in a waterproof case.
Fast forward 16 days and I’ve got a working version of the Android app (which is a fully functioning GPS device that uses OpenStreetMap vector data to render maps while offline) and I go about sourcing some hardware to create my first version of the remote. The Google board is very expensive ~$300, but in the intervening weeks a few more suppliers have entered the market place and I settle on the Freeduino USB Host board from moderndevice.com ~$70. It arrives a week or two later. About 6 hours after starting up the Arduino IDE for the very first time I’ve got a working prototype of my app remote control. Now, I haven’t used a soldering iron since 1991 when I was a freshman in college so this wasn’t easy for me, but I got it done. In fact, I used a gas powered thing to assemble the joystick shield kit I purchased from Sparkfun. I sent moderndevice.com a video of his new board in action and they posted it on their website. http://www.youtube.com/watch?v=kmnhFc3-oAI
I learned a few things from this. First, working with Arduino hardware is easy, even for a guy who has never done any embedded programming before. Second, Android is pretty much straightforward Java programming so if you can do one, you can do the other. Thirdly, I need to waterproof this remote because it’s fricking cool! How the hell can I do that? The only thing I know how to make, other than software, is cocktails. A little research introduces me to a thing called a 3D printer and that a place called Freeside Atlanta has one. On a Tuesday, with a few roughly drawn 3D files in my pocket I ride down to check the place out. The people there generously let me print out a couple of parts after the meeting (thank you Panda) and I get my first taste of the frustration of building tangible things. Unlike debugging software the iterative process is stultifying and slow. That is another story though...
What I learned from the that first trip to Freeside was the I needed to shrink down my electronics, A LOT. While the Freeduino host board from moderndevice.com works great I can’t really use it for this because it is just too big to shrink into useful sized package.
After more research I decide to give the Arduino Pro Mini a try with a circuitsathome.com USB Host shield attached to it. It is much smaller than the first Arduino, about 1/6th the size.
The smaller size allows me much more freedom to box it up and place it conveniently on the motorcycle. I ultimately design the enclosure below using my new toy SolidWorks. It is just awesome! It’s very expensive, but it is also an amazing tool that takes all the guesswork out of part design.
I order the parts for this design and proceed to actually build one.
It looks pretty good but some crash testing tells the plastic I was using was not up to the task.
http://www.youtube.com/watch?v=dHl4iiPZfUU
http://www.youtube.com/watch?v=T_CeNxcn8RU
So I come up with new a design and a new material.
This stuff is tough! Tougher than nails. I devised several tests to challenge it, but pretty much anything I hit it with broke. The assembly is a real bitch though! It’s taking me hours to assemble one of these bastards.
Plan three starts to hatch in my brain. This time with the help of a new friend and app customer I decide to build custom electronics. We agree on a 3 board design. I don’t know diddly about this electronics stuff but he teaches me how to read a schematic and working over the phone we actually succeed in designing and building new custom electronics which helps shrink everything down into a dainty little package. (I’ve since moved on to a milled aluminum enclosure which is boss)
http://www.youtube.com/watch?v=F9fpvCJAIvQ
http://www.youtube.com/watch?v=RiWlCVZFWnM
For me, this is another epiphany. I no longer am limited to electronics I can buy at the store. I am only limited to what I can imagine and build. The latter list is WAY larger than the prior one so let me tell you, my world has gotten a lot more interesting since this epiphany.
After taking part in the design process of the new electronics for my remote control I decide to try my own hand at circuit design. I am able to download some very useful and inexpensive PCB design software called Eagle and get started right away. Essentially no barrier to entry (unlike SolidWorks).
The first board I decide to build is a throwback to the board in the second remote design, it is similar to the Arduino Pro Mini except it has an integrated USB Host in it. It’s a small and incredibly useful tool. In itself, it is not a product, but it is something that creative people could use to build products. I felt the need to redesign it for several reasons. First off, the cost of two products from different vendors each with their own shipping costs is rather high > $40. Second, because the MAX3421ee require 3.3V to operate and USB requires 5V to operate there is an inherent incompatibility that the one small sized option available in the marketplace did not handle. The obvious solution is to build an Arduino with a the MAX3421ee with both a 3.3V, and a 5V linear voltage regulator (LDO). USB has a rather specific requirement of supplying 500mA to a connected client so I needed to make sure I specced the 5V LDO at 500mA and design the board accordingly. It takes a lot of sifting though Digikey.com to find parts that will squeeze into the small board that I want to design. Learn TONS about everything reading the datasheets. Along the way I come up with a few ideas for the board as well.
I finally settle on this guy and have it built at seeedstudio.com who will build my boards for <$1.50 each, delivered from China when I order 10 (so it costs $14.90 total).
In anticipation of the PCB delivery I order all the parts in the bill of materials (BOM) from Digikey and wait for my new boards to arrive. When they finally do arrive, about 3 weeks from order to delivery for the cheap delivery option, I realize there is a problem The 5V LDO I have and the area on the PCB do not match. What have I done?! The large chip below is what I had and the small chip below is what I needed. It goes in that little spot at the bottom left of the board above.
Always ready to make lemonade from lemons I go about reading the datasheet of the larger LDO I ended up with. It seems strangely perfect from what I want to do with it. This fact is a little strange to me because it is so much larger and yet not over qualified for what I am doing. I begin to wonder how the chip I chose could actually do the same thing in such a smaller package. I read the smaller part’s datasheet again and realize I must have gotten confused along the way. It cannot do what I need (it claims to be able to in bold print but the fine print clarifies that it can only do so when the Sun is conjunct the Moon in the Seventh House). Somewhere during the part drawing process I started looking at the wrong datasheet and then drew the wrong part I guess. At least I ordered the correct one. No worries though, this board is exactly as useful as the 2 board combination I was replacing (without its 5V LDO) so its not a major loss. I am able to salvage these boards with a little glop of solder across all the pads on each side of that chip.
Now I head back to Eagle to fix my mistake and order another pile of boards that actually fit the LDOs I have. Another $15 spent. Another 3 weeks pass. And viola!
You wouldn’t think that I could squeeze the “giant” chip in the place of that tiny one on that already cramped board, but amazingly I was able to and the overall size did not change at all. This board works exactly as I wanted it to and I am quite pleased with it. I am in the process of putting together a bunch of cool little demos to show off all the things it can do (talking to Android, communicating over bluetooth, HID, GPS, SLR camera control) and then I will start a Kickstarter to see if enough other people are interested in having some of these to get a large batch made. I’ve got a vendor in China willing to build them for about $17 if I build 500. I requested a bid for 100 from an on shore outfit as well but it has not come in yet. If the price is right, I’ll be able to do the Kickstarter with a smaller threshold price.
I am not done of course. No sooner did I get this guy built did I start using it to work on a new design for a new product. I’ll save that story for another time, but I’ll leave you with a teaser of it...
Great writeup. You've discovered the great difficulty with hardware design - you can't simply `cvs update` and get the latest rev. What type of material did you use for the later case design?
ReplyDelete