
Reprap Firmware comparison, smoother prints

I've been running Sprinter on a RAMPS 1.4 control board for my MendelMax since I built it a few weeks ago. This is the most common firmware in use, with the most community support. However there are other firmware options that are faster and more cutting edge, at the expense of having more bugs and a smaller user base. Today I switched to Marlin because I read that it handles acceleration between moves more smoothly, and can draw smooth arcs as well (a much more experimental feature).


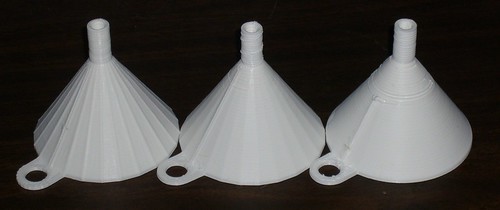
I chose this funnel as my test print because the cone and cylinders comprising it cover a range of arc sizes.

On the left we have a print with Sprinter. There is a strong ridge at the layer change point near the left side, and additional ridges on every edge around the model. This print took about 40 minutes.

In the middle is the exact same gcode run by Marlin. The edge ridges are gone, but the layer change ridge is more pronounced, especially on the cylinder at the top. This is much closer to what the original model looks like.

On the right is Marlin with arc gcodes produced by Slic3r. It looks through the model for series of points that look like arcs and replaces them with arcs. This produces an exceptionally smooth model everywhere except for the layer change ridge. There was a mostly unrelated print failure around 70% of the way up, everything above that should be ignored for the purpose of this comparison.


This has been an educational experience. I've learned how to begin configuring a new firmware (Marlin has a LOT more functionality with regards to runtime configuration), and I got a print quality increase as well. Switching away from Sprinter is not for the faint of heart, but I'd advise everyone to try it at least once.


PS: The latter two prints produced progressively less vibration in my printer as well, which should allow me to greatly increase my print speed in the near future

Comments

Popular posts from this blog

A Capacitive-Touch Janko Keyboard: What I Did at the 2017 Georgia Tech Moog Hackathon

Last weekend (February 10-12, 2017) I made a Janko-layout capacitive-touch keyboard for the Moog Werkstatt at the Georgia Tech Moog Hackathon. The day after (Monday the 13th), I made this short video of the keyboard being played: "Capacitive Touch Janko Keyboard for Moog Werkstatt" (Text from the video doobly doo) This is a Janko-layout touch keyboard I made at the 2017 Moog Hackathon at Georgia Tech, February 10-12. I'm playing a few classic bass and melody lines from popular and classic tunes. I only have one octave (13 notes) connected so far. The capacitive touch sensors use MPR121 capacitive-touch chips, on breakout boards from Adafruit (Moog Hackathon sponsor Sparkfun makes a similar board for the same chip). The example code from Adafruit was modified to read four boards (using the Adafruit library and making four sensor objects and initializing each to one of the four I2C addresses is remarkably easy for anyone with moderate familiarity with C++), and ...

Atlanta Cosplay Meetup: Group Build Update #3

It's been a while since we posted a progress report for the Atlanta Cosplay Meetup's ongoing project, and with Dragon Con right around the corner, we're nearing the finish line. Let's take a look and see what's been going on the last few months! Check out our previous progress reports here: Progress update #1 Progress update #2 Read on to see where we're at now...

What to Do With a Stack of Picture Frames?

When You Have Too Much Free Stuff! Our newest member Raul got his hands on a stack of about 40 picture frames that were being junked. On a general note Freeside tends to discourage large piles of objects randomly appearing as it tends to collect in corners. Raul got permission from our projects team with a time limit of a few weeks. In this case unnecessary, as the membership more or less attacked the pile of boxes and rapidly rendered them into things. Unfortunately starting off all the frames looked something like this: Not terribly useful. We don't even have any idea who these guys are. After a few passes through the planer, however, we get something like this: A perfectly good picture frame useful for stuff. First idea was to push a couple of these through a the laser cutter. Concept good, aim.... Aim was a little off. Also we had just rebuilt the laser computer and electronics so there were a couple of kinks to work out in CamBam's post processor: &nbsp ...