One of the costs of running an inkjet based 3D printer is that the cartridges have to be replaced on a regular basis. The Z400 and Z402 use Canon BC-20 ink cartridges which are readily available.
There are currently two known ways of making these cartridges ready for the printer.
The first method is to cut the cartridge in half, remove the foam inside, cut a Blue Falcon BD-50 Centrifuge tube in half, and epoxy it and a small O ring to the reservoir at the bottom of the cartridge. This is how the cartridges that are sold by Z Corp are made.
An alternative method is two drill two holes in the cartridge, epoxy down some type of barb, and flush the cartridge. This is the method I am currently using in my Z402. Click below for full instructions and a few pictures of the process.
I've done both methods, but always had trouble getting a good seal with the first method. Here's a few photos of the second method:
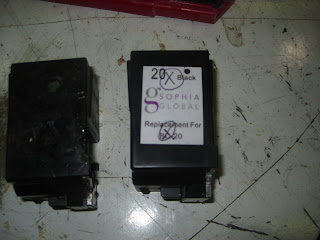
First, the Canon BC-20 print cartridge:

These remanufcatured cartridges are easily found online. It is also possible to find empty cartridges and refurbish them, but I've had better luck buying the refurbished ones directly.
First, mark two spots for drilling the holes, as shown below.

Once you've drilled both holes, clean them out with whatever tools you have on hand. You want the holes to be nice and clean.

I recommend that you insert the threaded part of the nozzles into the hole, and use a pair of small pliers to turn them until they are almost flush with the plastic from the cartridge.
The next step is to epoxy the nozzles down, and block off the air vent at the top of the cartridge. Mix up some five minute epoxy, and apply it all around the nozzles, and to the hole on the top of the cartridge.

Now wait for the epoxy to dry, and you have a new Z400/402 print cartridge! You will need to remove the tubing from the original ZCorp cartridge, and zip tie it over the new posts. If you have trouble with leaks, some teflon tape can be wrapped around the inflator nozzles. The top nozzle is for drainage, and the bottom nozzle is for fresh binder.
Here's a photo of the new cartridge, installed and ready to print.

You may want to blow air or binder mixture in to the cartridge to remove all of the existing ink. You may have a few layers of printing before the new binder starts to flow, so I recommend:

This method of making cartridges was invented by JC Wang, and documented here. Larry Trowell helped with creating this tutorial, and restoring the Z402 printer.
There are currently two known ways of making these cartridges ready for the printer.
The first method is to cut the cartridge in half, remove the foam inside, cut a Blue Falcon BD-50 Centrifuge tube in half, and epoxy it and a small O ring to the reservoir at the bottom of the cartridge. This is how the cartridges that are sold by Z Corp are made.
An alternative method is two drill two holes in the cartridge, epoxy down some type of barb, and flush the cartridge. This is the method I am currently using in my Z402. Click below for full instructions and a few pictures of the process.
I've done both methods, but always had trouble getting a good seal with the first method. Here's a few photos of the second method:
First, the Canon BC-20 print cartridge:

These remanufcatured cartridges are easily found online. It is also possible to find empty cartridges and refurbish them, but I've had better luck buying the refurbished ones directly.
First, mark two spots for drilling the holes, as shown below.

I recommend removing the label before drilling, but that is optional. If you have trouble with binder leaking out, try removing the label and roughing the surface up with a knife before drilling and gluing.
The next step is to choose what you're going to use to get the binder into and out of the cartridge. I recommend easily available inflator needles. Cut them down to about one to two inches in length, find a drill bit slightly smaller than the threaded part of the needle, and drill into the cartridge.

Once you've drilled both holes, clean them out with whatever tools you have on hand. You want the holes to be nice and clean.
Next, insert your nozzles in to the now drilled holes. You may need to stretch the hole out a bit. If so, use a pair of needle nose pliers. Insert them (closed) into the hole, and move it around and push it in a bit further. It should open up the hole a bit.
You should now be able to thread the inflator nozzles into the cartridge, as shown.

I recommend that you insert the threaded part of the nozzles into the hole, and use a pair of small pliers to turn them until they are almost flush with the plastic from the cartridge.
The next step is to epoxy the nozzles down, and block off the air vent at the top of the cartridge. Mix up some five minute epoxy, and apply it all around the nozzles, and to the hole on the top of the cartridge.

Now wait for the epoxy to dry, and you have a new Z400/402 print cartridge! You will need to remove the tubing from the original ZCorp cartridge, and zip tie it over the new posts. If you have trouble with leaks, some teflon tape can be wrapped around the inflator nozzles. The top nozzle is for drainage, and the bottom nozzle is for fresh binder.
Here's a photo of the new cartridge, installed and ready to print.

You may want to blow air or binder mixture in to the cartridge to remove all of the existing ink. You may have a few layers of printing before the new binder starts to flow, so I recommend:
- Blow air into the cartridge until no more ink comes out
- (Optional) inject binder into the cartridge and keep going until it comes out the proper color
- Start a long print using waste / old powder, and keep the machine running until you see the binder coming through cleanly.
It may sound like a big job, but it can be done in under 10 minutes once you've gotten good at it. Here's a photo of my most recent print, Mr Stephen Colbert:

This method of making cartridges was invented by JC Wang, and documented here. Larry Trowell helped with creating this tutorial, and restoring the Z402 printer.
Heh, cool hack!
ReplyDeleteWhere you ever a member of illegalroot.net by any chance? We are back online nowadays :)
hey what software do you use to print layer on top layer
ReplyDeleteany help would be great trying to get my printer going
The blog is really informative and i like to share it with my friends.I love to come back on a regular basis, please post more on the subject.
ReplyDeleteInk refill