Freeside is a great space, but our kitchen could be charitably described as "needs work". The countertops are old, difficult to keep clean, and just generally bad. What the heck, we're a hacker space, right? Lets hack some countertops.
Idea Credits (Instructables)
http://www.instructables.com/id/Concrete-Countertops-for-the-Kitchen---Solid-Surfa/
Materials:
Mold:
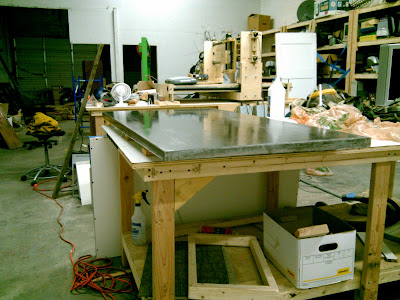
We cut the melamine sheet to size and screwed it together with drywall screws. Then we caulked the seams. We used black caulk because it is easy to see against the white melamine, so its easier to be sure you got everything. We also taped over the screw heads, just to be sure no errant concrete got in and made them impossible to remove. Then we put chicken wire and rebar reinforcement in the mold. We suspended the chicken wire above the bottom(top??) of the mold by sinking some drywall screws into the edges and wrapping safety wire around them.


Pouring:
At this point, it got interesting. We were on a tight budget, so rather than rent a concrete mixer we mixed by hand. We followed the directions on the concrete bag, but had to add more water because we could not get all the dry spots out. The resulting mix was very soupy. We also ended up being slightly short on concrete due to a measurement error. It turned out okay, but it could have been very bad. Remember, measure twice, pour once.

Once we had all the concrete in the mold we had to vibrate the mix to get all of the air bubbles out. Since no one actually had a concrete vibrator (or anything remotely similar) we improvised by vibrating the sides of the mold using some orbital sanders that were laying around in the space. It worked surprisingly well and we had hundreds of little air bubbles rising to the surface in no time. Sadly our vibrating efforts also caused the chicken wire to rise to the surface in no time at all. As mentioned before, I think a heavier wire mesh and/or a better hanging system might help avoid this problem.

Curing:
After pouring and vibrating the concrete we had to let it cure for a little over a week. There isn't a lot involved in this stage of the process other than covering up the mold with some plastic sheeting to hold in the moisture a bit. You should probably mist the surface with a little water now and again if the countertop is curing outside in heat/sun but ours wasn't so we didn't bother. We also could have used a thicker plastic dropcloth, as ours was very thin and ended up leaving impressions in the bottom of the countertop where it touched the wet concrete and wrinkled. We were shooting for letting the concrete cure to almost full strength (~7-10 days) before we broke the mold to make the polishing process a little easier. Fully cured concrete is a lot harder on the polishing disks and takes a lot more time to polish.

Polishing:
I got an air polisher from Harbor Freight. The air polisher was nice because we didn't have to worry about getting electrocuted, and was fairly cheap. It does, however, require a fairly beefy air compressor. You can also get purpose built electric polishers, but this worked out okay. We picked up a set of diamond polishing pads and got to work.


Sealing:
We used a "wet look" concrete sealer that we found at the local big box store to finish off the countertop. There are other options available, sealers made specifically for concrete countertops ($$$) and carnuba wax among others, but the sealer we used was relatively cheap and easily sourced. The Concrete Countertop Institute has published an excellent article covering the pros and cons of various sealing methods which can be found here.

We applied the sealer using cheap poly brushes which worked out quite well. As a warning applying the sealer with a brush will leave brush marks in the final finish; personally we thought it added character to the countertop but if you don't want brush marks use a roller or some other sort of applicator. We put the sealer on in two coats allowing the first to dry for a bit before applying the second coat.
In Place:

Conclusion:
All in all, this was a fairly successful project. The new top is vastly better than what was there, and we learned a lot in the process. Special thanks to Lloyd, Eric, Pete, Dan, Buddy, and anyone else I have forgotten!
Idea Credits (Instructables)
http://www.instructables.com/id/Concrete-Countertops-for-the-Kitchen---Solid-Surfa/
Materials:
- Quikrete countertop mix
- Wire Mesh
- Rebar
- Melamine Sheet
- Black caulk
- Screws
- Polishing pads
- Polisher
- Sealer
Mold:
We cut the melamine sheet to size and screwed it together with drywall screws. Then we caulked the seams. We used black caulk because it is easy to see against the white melamine, so its easier to be sure you got everything. We also taped over the screw heads, just to be sure no errant concrete got in and made them impossible to remove. Then we put chicken wire and rebar reinforcement in the mold. We suspended the chicken wire above the bottom(top??) of the mold by sinking some drywall screws into the edges and wrapping safety wire around them.


Lessons learned:
1. Be sure the caulk is smoothed down properly. Any bits that stick up will show up in the final countertop! To make this easier I'd suggest a caulking tool to help ensure an even bead all the way around. Another suggestion from others who have done this was to tape above and below each corner so that you have a clean line between the caulk and the textured melamine surface. We didn't do this and as a result ended up needing to do a bit more smoothing/grinding than we probably should have.
2. For the reinforcement in the countertop I think next time we'd go with something a little beefier than chicken wire. We were shooting for something thin enough to be easy to cut and work with. Unfortunately it's also springy, flexible, and really light weight and we had a difficult time getting it to stay in the center of the countertop during the pour. Something more like the welded wire mesh actually made for concrete reinforcement might work better as long as the grids aren't too big.
Pouring:
At this point, it got interesting. We were on a tight budget, so rather than rent a concrete mixer we mixed by hand. We followed the directions on the concrete bag, but had to add more water because we could not get all the dry spots out. The resulting mix was very soupy. We also ended up being slightly short on concrete due to a measurement error. It turned out okay, but it could have been very bad. Remember, measure twice, pour once.

Once we had all the concrete in the mold we had to vibrate the mix to get all of the air bubbles out. Since no one actually had a concrete vibrator (or anything remotely similar) we improvised by vibrating the sides of the mold using some orbital sanders that were laying around in the space. It worked surprisingly well and we had hundreds of little air bubbles rising to the surface in no time. Sadly our vibrating efforts also caused the chicken wire to rise to the surface in no time at all. As mentioned before, I think a heavier wire mesh and/or a better hanging system might help avoid this problem.

Lessons learned:
1. Just rent the mixer. Would have saved a lot of headaches.
2. Plan ahead for vibrating the concrete mix. Stick type concrete vibrators are readily available but it's probably faster and easier just to rig something up to vibrate the entire mold/table all at once.
3. Make sure you save a little extra concrete to fill any voids in the concrete.
Curing:
After pouring and vibrating the concrete we had to let it cure for a little over a week. There isn't a lot involved in this stage of the process other than covering up the mold with some plastic sheeting to hold in the moisture a bit. You should probably mist the surface with a little water now and again if the countertop is curing outside in heat/sun but ours wasn't so we didn't bother. We also could have used a thicker plastic dropcloth, as ours was very thin and ended up leaving impressions in the bottom of the countertop where it touched the wet concrete and wrinkled. We were shooting for letting the concrete cure to almost full strength (~7-10 days) before we broke the mold to make the polishing process a little easier. Fully cured concrete is a lot harder on the polishing disks and takes a lot more time to polish.

Polishing:
I got an air polisher from Harbor Freight. The air polisher was nice because we didn't have to worry about getting electrocuted, and was fairly cheap. It does, however, require a fairly beefy air compressor. You can also get purpose built electric polishers, but this worked out okay. We picked up a set of diamond polishing pads and got to work.


Sealing:
We used a "wet look" concrete sealer that we found at the local big box store to finish off the countertop. There are other options available, sealers made specifically for concrete countertops ($$$) and carnuba wax among others, but the sealer we used was relatively cheap and easily sourced. The Concrete Countertop Institute has published an excellent article covering the pros and cons of various sealing methods which can be found here.


We applied the sealer using cheap poly brushes which worked out quite well. As a warning applying the sealer with a brush will leave brush marks in the final finish; personally we thought it added character to the countertop but if you don't want brush marks use a roller or some other sort of applicator. We put the sealer on in two coats allowing the first to dry for a bit before applying the second coat.
In Place:

Conclusion:
All in all, this was a fairly successful project. The new top is vastly better than what was there, and we learned a lot in the process. Special thanks to Lloyd, Eric, Pete, Dan, Buddy, and anyone else I have forgotten!
What are the dimensions of the top and about how much does it weigh?
ReplyDeleteI dont think the sealant is necessary. Cement is thick enough not to ooze out, as any building project shows, unless u really over do the water quantity. As to reinforcements, you can throw in any metal rods as long as they are suspended. Just tie them to each other with wire. Finally, the best finish would probably be a self-leveling epoxy based clear finish, as in garage floors.
ReplyDeleteAll in all nice result.
I did this in a very similar fashion a few years ago and I used the precision grout and concrete dye. Concrete was ready for polishing in 24hrs (probably less). This speed does come at a premium though, as this stuff ain't cheap.
ReplyDeleteGreat job. Would these work for workbench tops. I don't saw on my bench but find myself pounding on it from time to time.
ReplyDeletenice job thanx1!!
ReplyDeleteI Really Enjoyed The Blog. I Have Just Bookmarked. I Am Regular Visitor Of Your Website I Will Share It With My Friends Thanks and I promises I will visit your blog again.
ReplyDeleteGranite countertop